It happens to the best of us. Sending out an email before it was fully completed or to the wrong individuals is very common in the workplace. But do not fear, if you have sent out an email which you shouldn’t have, it is easy to recall an email using Outlook 365.
How to Recall an Email in Outlook 365
Here are the steps to recalling that dreadful or embarrassing email which never should’ve gone out in the first place. Hurry, quickly go through these steps before your boss reads the email. The sooner you do it, the more success rate you will have in recalling the message.
1) Outlook 365 by default saves a copy of the sent emails in the Sent Items folder. Click on the folder to locate the email which you wish to recall. Double click on the email message to open it.

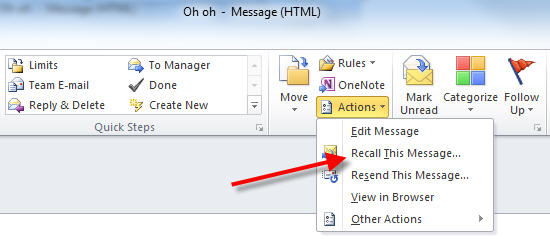
2) Once the e-mail message is open, locate the Actions icon under the Message tab. Click on the Actions icon to expand the menu items. Select Recall this Message from the Actions menu items. A dialog box will open for recalling the message.
3) From the dialog box, select what you wish to do with the email. If you simply wish to delete the email before anyone sees it, choose Delete unread copies of this message. If your email simply had few spelling errors or missing non-vital information, then choose Delete unread copies and replace with a new message.
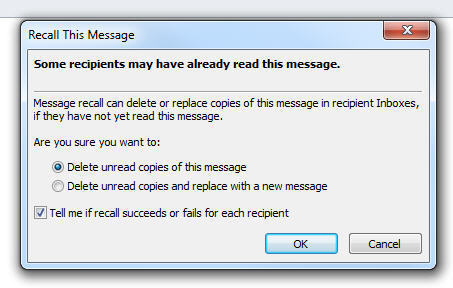
Ensure that the checkbox for Tell me if recall succeeds or fails for each recipient is checked. Click OK.
Upon completion of step 3, Outlook 365 will attempt to recall the email from the recipient(s). If you had several recipients, the recall may take longer. Note that if the recipient(s) has already read the email message, the recall may not work. However, if you recall the message quick enough, it will work.

Once all the emails have been recalled, Outlook 365 will send you a Message Recall success email confirming that the recall was successful. If some of the recipients already read the email, a recall failure message will be received.

