Dropdown lists can be created in Excel to allow a user to select from a list of items during data entry. Creating a dropdown list in Excel is quite simple. One of the benefits of using a drop-down list as opposed entering data manually is to prevent entry errors. In addition, drop down lists ensure that data is entered uniformly throughout the worksheet. If a user tries to enter data in a cell for which a dropdown menu exists, Excel rejects the entry unless it is identical to one of the options in the dropdown menu. Continue reading to find out how to create dropdown lists in Excel.
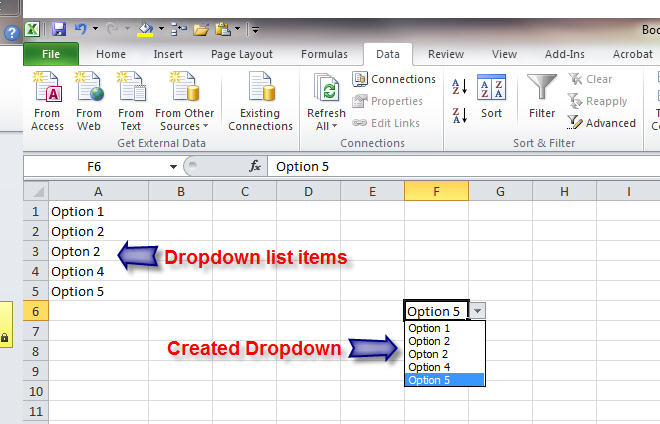
For this tutorial, the data to be displayed when a drop-down menu is clicked on will be entered in cells A1:A5. You can either create the items in a single column or a single row. For example, instead of A1:A5, it can be A1:E1. We will be creating a dropdown list in cell F6 using the data entered in A1:A5. Let’s get started.
The dropdown arrow becomes visible when the cell containing the list is selected or active. Otherwise, the cell appears as a normal cell.
You don’t necessarily have to create a list of options separately to create a dropdown list. If you have a relatively small list of options, you can directly enter the list items in the Source field under Data Validation dialog box. Here are the steps:
You have the option to create the dropdown list in multiple cells at the same time. Select as many cells as you want, either by clicking and dragging the mouse or simply pressing down Ctrl key and clicking on the specific cells you want. Then follow steps 3 to 8 to enter the dropdown list in all those cells at once.
When an error alert is setup for the dropdown list, it will generate a message for Excel users when they try to enter something manually into a cell for which a dropdown menu exists. Follow these steps to enter a custom error message for dropdown lists in Excel:
There you go folks. This is how you enter drop down lists in Excel. If you found this post useful, please leave a comment.
If you are experiencing issues with your Windows system due to the Crowdstrike update, here's…
Koodo customers in Canada can now get Amazon Prime, Netflix Standard with ads and Disney+…
If you received an email with a single use code to login to your Microsoft…
If you are trying to login to your Microsoft account and getting the following error…
Most system admins set Microsoft Teams status to show Away when you are inactive for…
If you are using a Windows computer and your keyboard doesn't have a backslash "\"…