Delay Delivery is a useful feature in Outlook 365 which allows you to schedule an email to be sent at a later time. So, don’t worry about sending out those important emails on a day you planned to be away from the office. You can delay sending an email at anytime within the given century.
Here are the steps to schedule an email to be delivered at a later date and time.
1) From the Outlook 365 Inbox, click on the New E-mail button to create a new email. Complete the e-mail by filling in all the applicable fields including the To, Subject and the Message.
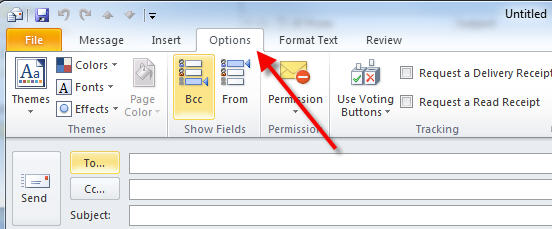
2) Once the e-mail has been drafted, click on the Options tab from the ribbon.
3) From the Options tab, locate Delay Delivery icon. Click on the icon to open the settings to be applied for sending your email at a later time. A dialog box will open.
4) From the Delay Delivery dialog box, ensure that the Do not deliver before: checkbox is checked. Enter the date you wish to deliver the e-mail. Also, enter the time for delivery. The e-mail can be delivered within the same day or anytime in the future within the same century.
5) In order to ensure that the e-mail gets properly delivered to all the recipients, fill in the Contacts field with the e-mail addresses of the recipients. Keeping this field blank and relying on the e-mail addresses listed in the To: field may cause technical problems. So, have the Contacts field filled out as well with all the recipient’s email addresses. You can also select several other settings from this area. For example, you can have the replies sent to a different email address, have the task expire after a specific date if the email fails to deliver, etc. Once you have selected the proper settings, click Close.
That’s it, now sit back and relax. When the set date and time comes, Outlook 365 will deliver the email. To see if your e-mail was delivered, check your Sent folder and ensure that the email is listed there.
Important Note: The date on the email sent will be the date and time you drafted the email and scheduled the delay delivery. It won’t be the date when the message was sent out.
If you are experiencing issues with your Windows system due to the Crowdstrike update, here's…
Koodo customers in Canada can now get Amazon Prime, Netflix Standard with ads and Disney+…
If you received an email with a single use code to login to your Microsoft…
If you are trying to login to your Microsoft account and getting the following error…
Most system admins set Microsoft Teams status to show Away when you are inactive for…
If you are using a Windows computer and your keyboard doesn't have a backslash "\"…
View Comments
How do you delay a FORWARDED email?
once you have closed the delivery box, do you keep the email open or do you hit send?
That is correct, Darryl. Once you have closed the delivery box, you will hit Send to have the email queued in the system for delivery at a later time. Even though you hit send, it will not be immediately sent out.
On my older version of Outlook you can add this command to the top ribbon, is there an option for that in Office 365?
Yes, you can add it in manually. Simply click on New Email -> Options -> Right click on Delay Delivery button and select Add to Quick Access Toolbar. That's it, now you should have the button on the Quick Access Tool Bar which is just above the ribbon. This button will show up when you are composing an email.